Tuesday, May 31, 2011

Wintersowing 2011 Wrapup: What worked and lessons learned

In January and February, I set out a series of recycled plastic water containers filled with potting soil and sown with seed that could undergo or absolutely required cold stratification. I did a tally the other day to see how my wintersowing experiment went.


I was disappointed. Some seed performed excellently and a few did OK. But overall, most seeds had very poor germination rates (20% or less) or failed to germinate at all. I was shocked at the no-shows from what I would have thought were surefire wintersowing successes like the New England Aster and two of the three Asclepias species.

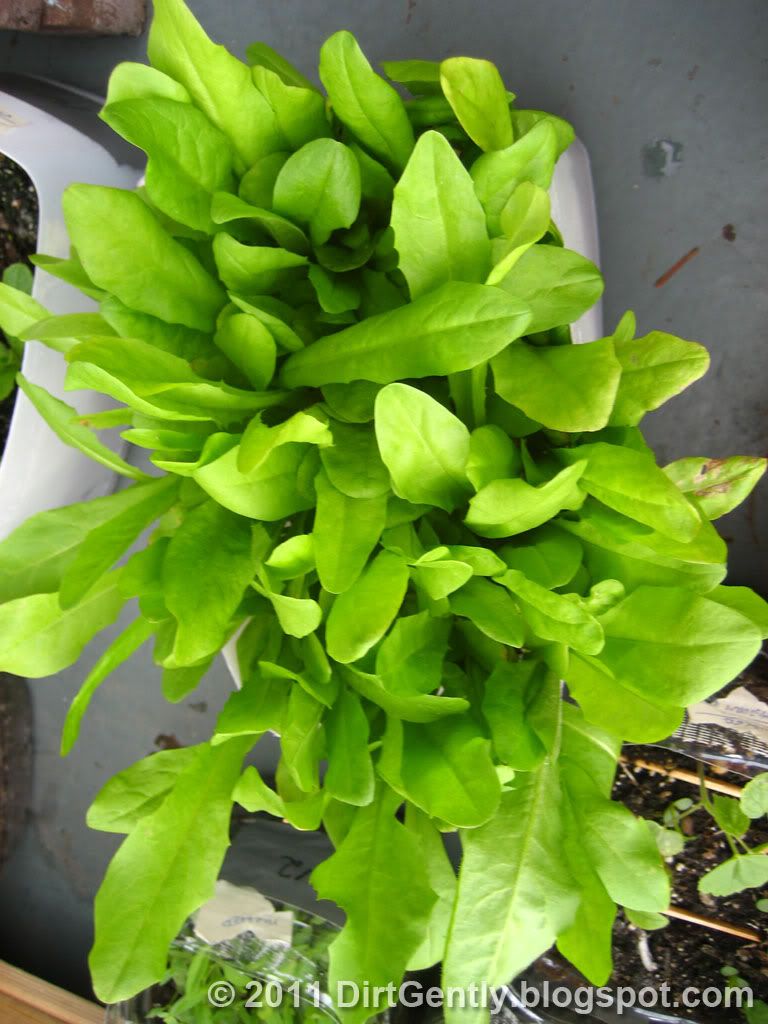
Wild chicory, one of the rare seeds liked wintersowing

It's possible that one contributing factor is the unusually wet and cold spring we have had; I read Monday that MontrĂ©al experienced double the average precepitation for this time of year. As a consequence, the potting soil was wet for prolonged periods of time and a lot of the containers became green with moss or (what is possibly) algae. I can see how the plants preferring quicker drainage would be unhappy.

Mossy!

Another possibility is seed source. All of the alpines were from Rocky Mountain Rare Plants' (RMRP) going out of business sale. None of them have been great performers wintersown or under lights (but worse when wintersown), despite many of them sold as easy 70°F germinators.

Amusingly enough, a few of the ungerminated pots surprised me with sprouts Monday morning when I went  to throw them out. This convinced me enough to keep some of the other containers with no apparent germination around for a little longer (**).

Would I repeat the experience? I'm not sure.

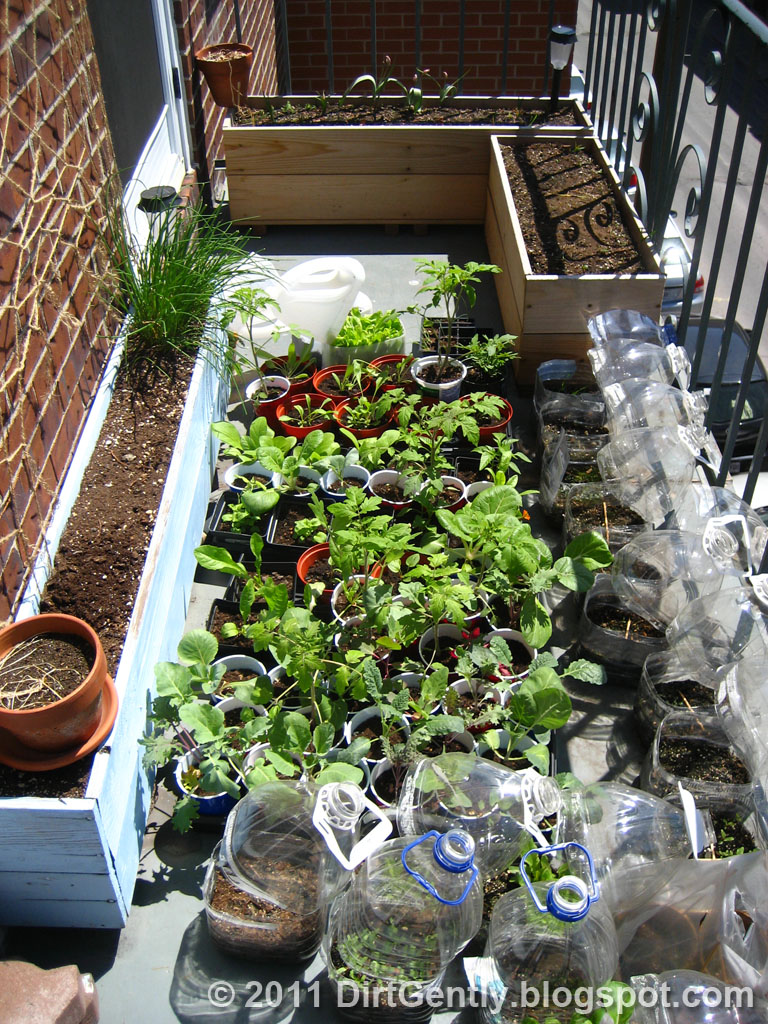
I would definitely plan better if I did it again. I struggled to find somewhere to plant the abundance from the excellent performers. The early emergence of the spinach and bok choy in April caught me completely off guard -- they bolted before I could get them in the ground as it were.

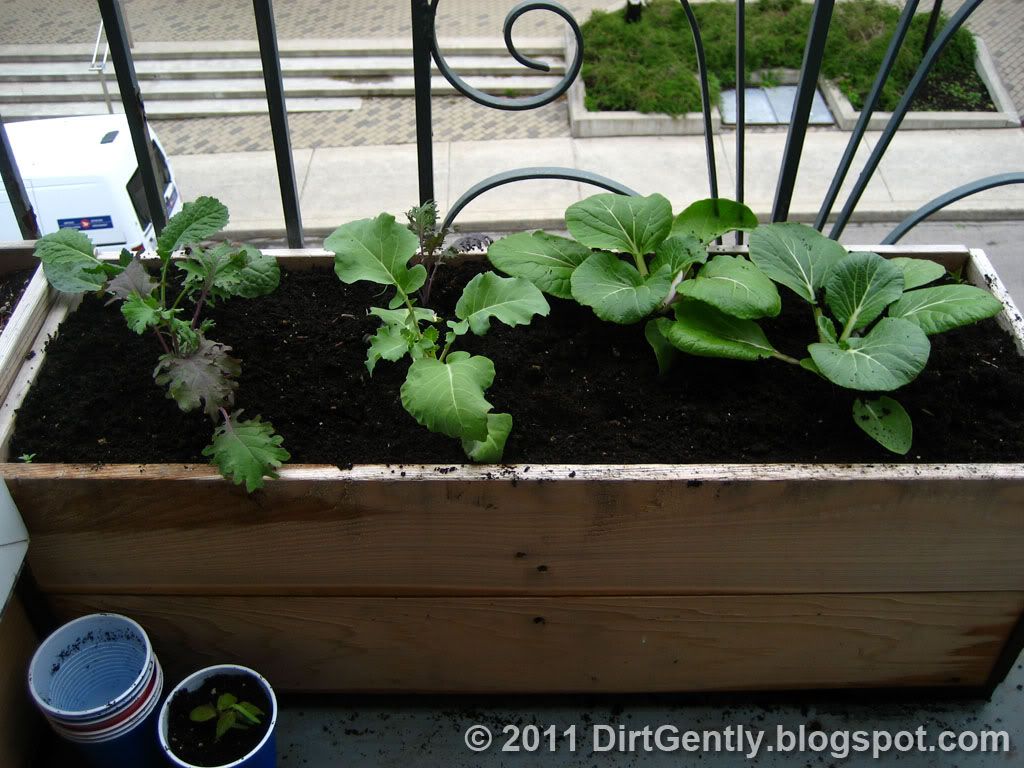
Happy bok choy, spinach, red orach

I would probably make up a custom, soilless mix rather than bagged el-cheapo potting mix to better control drainage and unwanted fungus / moss / algal growth. When it became clear that my containers were waterlogged, I found it difficult to add drainage with it already full of medium; it would be far easier to tape over extra drainage holes to reduce drainage than to make new ones.

But mostly, the large number of poor performers tempered any joy I had from seeing the other sprouts emerge even though I know that some of these might be hard to germinate under any circumstances.

The one huge benefit to wintersowing is virtually eliminating the need to harden off the little guys since they were exposed to the sun's deadly rays from the beginning (the containers were uncapped). I've managed to kill off or damage a not insignificant amount of seedlings grown under lights while hardening them off (and, it seems, the more precious the seedling to me, the more likely it would die a quick UV death) this spring. I've had zero deaths from hardening off in the wintersown bunch. To be extra cautious, I let them acclimatize to the elements for a couple of days by removing the duck tape keeping them shut, and then cut off the top of the containers altogether.


WINTERSOWING 2011 RESULTS (full spreadsheet here)
Excellent (80-100% germination)
Harebell (Campanula rotundifolia)
Black-eyed Susan (Rudbeckia fulgida 'Goldsturm')
Shasta Daisy (Leucanthemum × superbum 'Alaska')
Blanket flower (Gaillardia × grandiflora 'Goblin')
Milkweed (Asclepias syriaca) *
Rampion (Campanula rapunculus)
Chicory (Cichorium intybus)
An aster of some kind (100-0670) *
Spinach (Spinacia oleracea)
Bok choy (Brassica rapa chinensis)
Red orach (Atriplex hortensis)

OK (50-79% germination)
Mystery peanut pod seeds (100-1046) *
Prairie gayfeather (Liatris spicata)

Poor (1-49% germination)
Echinacea (Echinacea purpurea)
Mystery flower pod (100-0660) *
Prairie crocus (Pulsatilla patens) (RMRP) ***
Black pasque flower (Pulsatilla pratensis subsp. nigricans) (RMRP) ***
Pulsatilla campanella (RMRP) ***
Teasel (Dipsacus sylvestris) *
Blackberry lily (Belamcanda chinensis)
Caucasian Bellflower (Campanula bellidifolia) (RMRP)
Gunnison's mariposa lily (Calochortus gunnisonii) (RMRP)
Avery peak twinpod (Physaria alpina) (RMRP)
Tibetan blue poppy (Meconopsis betonicifolia) ***

Failed to germinate
Alp lily (Lloydia serotina) (RMRP) **
Alpine kittentail (Besseya alpina) (RMRP) **
Stemless gentian (Gentiana acaulis) (RMRP) **
Butterfly weed (Asclepias tuberosa)
New England aster (Symphyotrichum novae-angliae)
Blue Queen salvia (Salvia × superba)
Prairie coneflower (Ratibida pinnata) **
Bottle gentian (Gentiana andrewsii) **
Swamp milkweed (Asclepias incarnata)

* Personally wild-collected
** Second chance
*** Provisional pending ID of seedling (is it a weed lookalike or not?)

Wednesday, May 25, 2011

Big gardening weekend in Montreal coming up

On my gardening calendar I see the Great Gardening Weekend put on by the Jardin Botanique de MontrĂ©al Friday through Sunday. On Saturday, Various Eco-quartiers around town are giving away annuals, perennials and, in some neighbourhoods, compost too. Saturday and Sunday, Gayla Trail's friend is holding her annual heirloom tomato sale. And there's a cleanup of the Champs des possibles in Mile End Saturday afternoon also.

My lithops is disgorging!

Developing true leaves? Budding? I'm not sure what the proper term is, but one of my lithops seedlings is developing a new set of leaves. Exciting!


To be honest, it also reminds me a little bit of this classic scene (not for the squeamish!):


Wordless Wednesday


Saxifraga x arendsii


Tuesday, May 24, 2011

So you survived the Rapture and the long weekend: Build a cedar planter!

Efforts of previous years and this year's starts.
Ages ago, an ex-roommate and I built a narrow planter to place against the brick wall of the southwest-facing balcony. We made it out of untreated pine, and painted the outside with some leftover blue bathroom paint. She also wove a net to hang behind the planter for morning glories to climb. I don't think either of us knew what we were doing as far as "proper carpentry" goes, but the planter's still solid after more than five years of all-weather service outdoors.

Last year when I took up container gardening again, I built a couple of cedar planters for bulbs (which mostly failed to come up). And I built another one a couple of weeks ago. Due to popular demand, here are the plans for the last planter I built. Okay, exactly two people, one not in the Dirt Gently universe, asked about the planters in a really offhand way, but this being a blog, I'll indulge my vanity anyway.

This year's model

Notes
These plans are for the planter that fills a specific 40x16" space behind the door to my balcony, so there's a moderate amount of leftover lumber in this plan. You can adjust the dimensions appropriately and the lengths of the 1x6s you buy (they come in 4', 5', and 6' lengths at the local lumber yards) to reduce waste.

Successfully install brass screw. Shiny!
Keep in mind also that lumber dimensions are nominal: a 1x6 plank is actually a little less than 1" thick and 6" wide. And, depending on various factors like how wet the wood is, the actual actual dimensions of the lumber might not be exactly the same as the supposed actual dimensions. This variation is accounted for on the bottom of the planter by spacing the planks apart for drainage, but you may want to cut the side supports a little shy of 10½" (say, 10¼" inches) to avoid them poking out the top of the planter.

Another thing I learned is to account for the kerf when measuring out the cuts that are made. Measure twice, cut once!

Irretrievably snapped brass screw filled in with wood putty
on the right, boring stainless steel deck screw on the left
Some notes on screwing. Brass screws look really beautiful against cedar but because brass is really soft, you need to drill pilot holes for the screws and screw them in with the utmost care if you want to avoid snapping them off mid-insertion. I've heard that lubing them up with some beeswax will help reduce the friction and torque that causes them to snap if you screw too hard. Brass screws are also many times more expensive than regular stainless steel deck screws treated for use with cedar, so snapping many of them will hit your pocketbook hard. And removing snapped screws is a pain the butt. This is why I used stainless steel screws in the non-visible parts of the planter. You can use 8x2 stainless steel screws throughout if you'd rather avoid the hassle (although 8x1¾ would be better. With 2" long screws, the pointy end will just barely poke through the other side of the joined pieces and scratch you when you go digging around in the dirt. But I don't think 1¾" long deck screws are widely available).

Note how the screws are flush are slightly embedded into the surface of the wood in the pictures above. This is done by using a countersink drill bit to create a little crater for the head of the screw to hide in.

Snapped brass screws = A fistful of (many) dollars
Finally, each of the vertical supports is the nexus for screws coming at least two, and sometimes three different directions. Make sure that they don't intersect by paying attention to the measurements in the diagrams accompanying each step!

Cutaway of bottom corner or vertical support showing how three different
screws are anchored in it in close proximity


Download cedar planter plans
Edit: Finally managed to figure out how to upload the model to Google Sketchup's 3D Warehouse and avoid the dreaded "401 Unauthorized" error. You can download the cedar planter model here. You will need Google Sketchup or the Google Sketchup Viewer to open the file.

Equipment
Eye protection
Measuring tape
Sawhorses
Pencil
Square
Circular saw
Wood clamps
Power drill with socket bit
Countersink drill bit
5/64" or 7/64" drill bit for pilot holes
Beeswax (optional, for lubricating brass screws)

Materials
2 2x2 cedar posts, 8' long
7 1x6 cedar planks, 5' long
40 Number 8 1¾" long (8x1¾) flat head socket brass screws
27 Number 8 2" long (8x2) flat head socket stainless steel deck screws for cedar
Enough weed suppression fabric to cover the bottom of the planter

Cut List
6 2x2 at 10½" long (vertical supports)(optionally 10¼" long, see notes above)
3 2x2 at 12" long (cross supports)
4 2x2 at 15" long (planter feet)
4 1x6 at 40" long (planter sides)
3 1x6 at 40" long (planter bottom)
4 1x6 at 15" long (planter ends)

Build instructions
Planter is 40" long by 16" wide by 11" tall, not including feet. Click to enlarge

Step 1. Start building one side of the planter by attaching three vertical supports along a 40" long planter side plank as in the diagram below. Use wood clamps to temporarily assemble all the parts first, making sure that everything is square and that the end pieces will be flush. Then drill pilot holes in the plank and the supports, then use the countersink drill bit on the plank, and finally screw the plank to the vertical supports using brass screws (careful! remember forcing brass screws in will snap them!). Make sure that the two supports at each end of the side are ½" in from the vertical edge of the plank; this will allow the face of the 15" long planter ends to be flush with the ends of the planter sides. Repeat the process to build the other side of the planter. 

Step 1: Start building a planter side. Click to enlarge.

Step 2. Take one of the sides that was built in step 1 and attach a 40" bottom plank to one of sides as in the diagram below. Remember to use wood clamps to pre-assemble, make sure everything is flush, then drill pilot holes and countersink craters. Use the 8x2 deck screws. Note that the screw attaching the bottom plank to the centre vertical support is 19" from one of the screws at the end, and 18½" from the other! Repeat the process for the other side, making sure that when both sides are facing each other like mirror images, the centre screw is 19" from the same side and 18½" from the other!

Step 2: Add a bottom to the planter side. Click to enlarge

Step 3. Attach each of the sides with the cross supports as in the diagram below using the 8x2 deck screws. I found it easiest to pre-assemble the whole deal on sawhorses with wood clamps and clamber under to drill pilot holes and insert screws. I find that measuring out where I should drill my pilot holes with all components separate and then screwing everything together afterwards gave poor, imprecise results.

Step 3: Attach cross supports and planter sides together. Click to enlarge

Step 4. Unscrew the sides from the whole assembly, then attach the middle plank to the bottom of the planter making sure that everything is square. There should be a space of about ¼" between the middle plank and the ones on either side of it for drainage.

Step 4: Adding the middle plank to the planter bottom. Click to enlarge.

Step 5. Starting at one end, remove a cross support. Sandwich one end of the weed suppression cloth between the cross support and the bottom plank. Re-attach the cross support. Repeat for the other two cross supports. Attach the feet to the bottom of the planter (on the opposite side of the cross supports), using deck screws, as in the diagram. The ends of the feet should be recessed ½" in from the edges of the bottom of the planter.

Step 5: Adding feet to the planter (Viewing planter bottom from the top down). Click to enlarge.

Step 6. Add the top plank to each side piece as in the diagram below. Use the brass screws.

Step 6: Adding the top plank to the side pieces. Click to enlarge.

Step 7. Reattach the side pieces to the bottom piece.

Step 7: Assembling the side and bottom pieces. Click to enlarge.
Step 8. Attach the ends with brass screws as in the diagram below. Note that the end pieces may be a tight fit. I managed to gently force them in by hitting them with the fleshy side of my first, but you should probably use a rubber mallet to tap them in: it's a much more refined approach to woodworking.

Step 8: Assembling the end pieces. Click to enlarge
Step 9. Step back and pat your self on the back. You have a planter!

Side view

Top view

Inside corner view

Bottom view (missing a foot!)

Friday, May 20, 2011

Gratuitous Garden Macros

Because, why not?


Yup, my wintersown spinach and bok choy bolted in situ when I didn't get around to potting them up in time.


But I'm saving the best one of the lot for Wordless Wednesday.

Thursday, May 19, 2011

Backyard wilderness

I snapped a few more pictures of the patch of mystery-could-be-anemones down by the compost heap earlier this afternoon. It looks like the plants are getting ready to flower.


Next to the maybe-anemone patch, I also spotted a few of the lovely violas that have been gently rampaging around the front yards (such as they are) in the neighbourhood. My landlord will inevitably mow them down, and I would dearly love to see them next spring in my big cedar planters. What's the best way to move one or two of them upstairs? Alternately, what do the mature seed heads look like?

Tuesday, May 17, 2011

Mystery compost heap neighbour

Trouble in the compost heap? Mine seems to be full of fruit flies and sprouts this week, but it doesn't appear to be turning things into compost very quickly these days. I blame it on the cold and drizzly weather, but I secretly wonder if something's gone wrong. Maybe it needs a good aerating mixing.

I must've done something right in the past though, since the whole area around the heap is a lush, dense sea of these leaves growing 6" off the ground. No flowers that I can see. I wonder what they are.

Front

Back
Edit: Preliminary guess due to a complete fluke while browsing OntarioWeeds.com is that it’s Anemone canadensis, so it should be flowering soon.

Sunday, May 15, 2011

Snowdrop and winter aconite mystery, more planting out

I had planted snowdrop bulbs and winter aconite corms in cedar planter #2 last fall in hopes of seeing a nice display this spring, but the thaw has come and gone I saw nothing but weeds emerge from the soil.

Curiousity got the better of me today and I dug up the contents of the planter only to find that the corms were still bare, hard little marbles, and the bulbs were mushy with no signs of shoots or roots.

I’m not sure why neither bulb nor corm got established, although I strongly suspect that the medium was perhaps a little too heavy for their liking and what roots they did send out in the fall rotted off. Or perhaps it was too cold for them to overwinter in a balcony container, despite mulching them amply.


I have way too many veggie starts for the amount of available planters on my back balcony, so I planted out the remainder of the kale, broccoli, and bok choi in cedar planter #2 after digging in 1/3 cup of dried chicken manure.

I don’t recall what I put in the planter as substrate, but when these veggies mature, I’ll probably end up amending the medium with lots of perlite to lighten it up.

Planting out in the back balcony

The vegetable seedlings hardening off on the front balcony have been getting unreasonably large in their solo cups over the past couple of weeks while I’ve procrastinated on planting them out. I finally went to the Home Despot this morning to gather the necessary supplies.
Each container was filled with Berger BM-1 all-purpose mix (suprisingly cheaper per unit volume than Miracle Gro potting mix) and amended with vermiculite (~ 4 litres for the big containers) and dolomitic lime (~2 cups for the big containers). 1/3 cups of dehydrated chicken manure was mixed into the top 6 inches or so of the mix.
The containers seemed huge when I picked them up through Freecycle, but now that they've been planted, they all seem a little crowded. There's four broccolis (two each of Di Cicco and Purple Peacock) in the 16" container on the left; a bok choi, two Red Russian kales, and a Wakefield cabbage in the middle 19" container; and an orach, a collard, and a Dino kale in the 12" container on the right.
Between the fancy new medium that I made, the crowding, the lack of sun on the balcony (it probably gets 3 or 4 hours of morning sun), and the squirrels and neighbour’s rat-dog that live back there, I’m not sure how the veggies will do. I’m hopeful, though.

I was going to plant out the spinach too - I eat lots and it's the primary reason for this veggie patch - but upon closer inspection, it appears that all of my starts have bolted already. I'm not sure why this would be since it's been cool and wet for most of the spring. Could it be because they are a little rootbound?

Wednesday, May 11, 2011

Coffee holder to most, plant holder to gardeners


From BalconyGardener.ca

Ladybug sighting


Last week, among the chives, I found this little guy hiding. There are also bumblebees everywhere in the neighbourhood, and monarch butterflies are not far behind. I suppose I ought to start planting my seedlings out soon.

Tuesday, May 10, 2011

Lithops flowering timelapse

I hope my little guys get big enough to flower eventually.

Wednesday, May 4, 2011

Moonflower craziness, seedlings + lithops

I don't know why I was so shocked yesterday when I saw that my moonflower seeds had exploded into growth only 4 short days after planting given what happened last time but I was. This time around, I think I got the moisture level right because there's no white mold. Hopefully, they don't turn purple or get eaten by bugs.

Moonflower top growth

Moonflower bottom growth
Speaking of getting eaten by bugs, here's what nice and healthy bug-free bok choy looks like. Beautiful, isn't it?


In fact, all of my second generation (for 2011) seedlings are pretty healthy looking, although some of the older parts of the stems growth on the orachs and brassicas look a little skinny and weak compared to the newer growth (i.e., thinner at the bottom of the stem than at the top). The transition between skinny and fat at the node where the seed leaves grew from. This could probably be corrected by growing them next time at lower temperatures and with the lights a bit closer after germination.

Second gen seedlings 2011
Di Cicco Broccoli

Red orach

Orach
As for my lithops, they all seem to be doing interesting things. There are nice plump lithops and then there are wrinkly-looking guys. Some are changing colours, others are retreating into the ground, and yet others ... are they supposed to look like that?


Is this normal?

Monday, May 2, 2011

Violets in the hood


There are huge patches of these violets flowering in yards, empty lots — everywhere in the 'hood.