
Wednesday, January 26, 2011
Wednesday, January 19, 2011

Sunday, January 16, 2011
Pulsatilla integrifolia
 |
| Pulsatilla integrifolia, via Luc Gilgemyn at the SGRC Forum |
Saturday, January 15, 2011
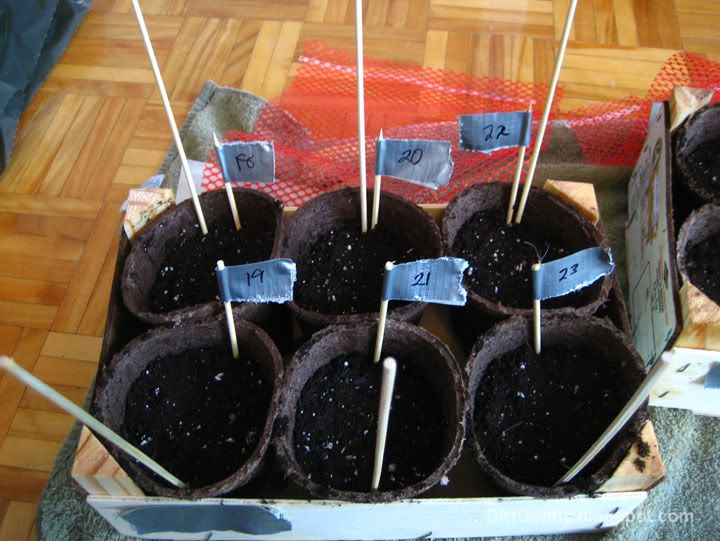
Wintersowing 2011 part 3
Finished wintersowing today. Some plants like the various Pulsatilla species and the blue poppy apparently don't like transplanting, so I sowed them in 4" peat pots, six pots to a tangerine crate. Each pot/crate set was placed inside a clear plastic bag with ventilation and drainage holes punched in it. I used little duct tape / BBQ skewer flags to identify each pot.


Final list of plants sown:


Final list of plants sown:
- 10-1046 (unidentified triple-peanut pod seeds)
- 10-0660 (unidentified wild-collected Iris)
- 10-0670 (unidentified wild-collected Aster)
- Alp Lily (Lloydia serotina)
- Alpine Kittentail (Besseya alpina)
- Blackberry Lily (Belamcanda chinensis)
- Black-eyed Susan (Rudbeckia fulgida var Goldsturm)
- Black Pasque Flower (Pulsatilla pratensis subsp. nigricans)
- Butterfly weed (Asclepias tuberosa)
- Campanula bellidifolia
- Chicory (Cichorium intybus)
- Echinacea (Echinacea purpurea var Primadonna Deep Rose)
- Gaillardia Goblin (Gaillardia x grandiflora)
- Harebell (Campanula rotundifolia)
- Mystery flower pod seeds (see picture below)
- New England Aster (Symphyotrichum novae-angliae)
- Physaria alpina
- Prairie Crocus (Pulsatilla patens)
- Pulsatilla campanella
- Rampion (Campanula rapunculus)
- Salvia (Salvia x superba var Blue Queen)
- Shasta Daisy (Leucanthemum x superbum var Alaska)
- Stemless Gentian (Gentiana acaulis)
- Tibetan Poppy (Meconopsis betonicifolia)
- some sort of Teasel-like plant
- Wild-collected milkweed (Asclepias syriaca)
I'm beginning to wonder where I have room for all of these plants!
The mystery flower pod, by the way, look like these:
 |
| via Carol Parafenko's blog |
Any idea what these are? I have no idea why I haven't documented these or entered these into my Folia seed stash database.
Wednesday, January 12, 2011

Tuesday, January 4, 2011
Wintersowing 2011 part 2
Here's my list of seeds that I have wintersowed so far this season:
- Alp Lily (Lloydia serotina)
- Alpine Kittentail (Besseya alpina)
- Blackberry Lily (Belamcanda chinensis)
- Black-eyed Susan (Rudbeckia fulgida var Goldsturm)
- Butterfly weed (Asclepias tuberosa)
- Campanula bellidifolia
- Chicory (Cichorium intybus)
- Echinacea (Echinacea purpurea var Primadonna Deep Rose)
- Gaillardia Goblin (Gaillardia x grandiflora)
- Harebell (Campanula rotundifolia)
- New England Aster (Symphyotrichum novae-angliae)
- Physaria alpina
- Pulsatilla campanella
- Rampion (Campanula rapunculus)
- Salvia (Salvia x superba var Blue Queen)
- Shasta Daisy (Leucanthemum x superbum var Alaska)
- Stemless Gentian (Gentiana acaulis)
- Mystery peanut-shaped seed pod seeds
- some sort of Teasel-like plant
- Wild-collected milkweed (Asclepias syriaca)
Some other seeds I plan to wintersow also:
- Black Pasque Flower (Pulsatilla pratensis subsp. nigricans)
- Prairie Crocus (Pulsatilla patens)
- Prairie Crocus red form (Pulsatilla vulgaris)
- Poppy (Papaver somniferum)
- Tibetan Poppy (Meconopsis betonicifolia)
Wintersowing 2011
I spent a little time during the first couple of days of 2011 getting ready for wintersowing. I've 15 containers so far, most of them clear. There are a couple of containers that are translucent, but I'm following the rule of thumb that if you can see your thumb through plastic, then it will be fine for wintersowing. Each container is very deep: there is enough space in each of them for up to 4 inches of medium, and plenty of headroom for the seedlings. Recommended minimum is 2 inches clearance.

The containers should be cleaned with 10% Clorox and air dried, but unusually for me, I skipped this step. I hope it doesn't come back to bite.
I labeled each container in several places with a number with permanent marker. To avoid being left with a bunch of unidentifiable seedlings due to the sun bleaching the container ID away while it's outside, I covered a couple of ID numbers on each container with duct tape.

Next, I cut each container almost all the way around , about 5" from the bottom to create a hinge.


Next, I filled each container with medium (regular potting soil, not seed starting soil) up to 4 inches deep. Minimum recommended depth is 3 inches. I moistened the medium thoroughly and allowed the excess water to drain, and then sowed my seeds. Where required, I covered the sown seeds with medium.
Finally, I taped the bottom and top halves shut, and put the containers out on the balcony. I left the caps off for ventilation.

There are fifteen containers in all, some in the foreground of the picture, and some between the screen door and the planters at the top of the picture. I plan to wintersow more seeds come February.
Some other notes I gathered from Wintersown.org:
- Control ventilation and drainage by increasing # of holes or taping them over. Start with 5 holes per container.
- Some condensation on the lid is good - don't let the container dry out. No condensation or too much condensation is bad; adjust ventilation and drainage as above.
- Harden off seedlings by increasing size of vents as spring warms up and transplant time approaches
- No need to pot up: hunk o' seedlings method - grab a bunch and plant.
- Don't let the flat overheat, especially as springs warms up.
- Expect high germination percentages, but you will also have failures.
- A couple of days after transplanting, fertilize seedlings at 1/4 strength. Every two weeks, increase to 1/3, then 1/2, then 3/4 strength fertilizer.
Monday, January 3, 2011
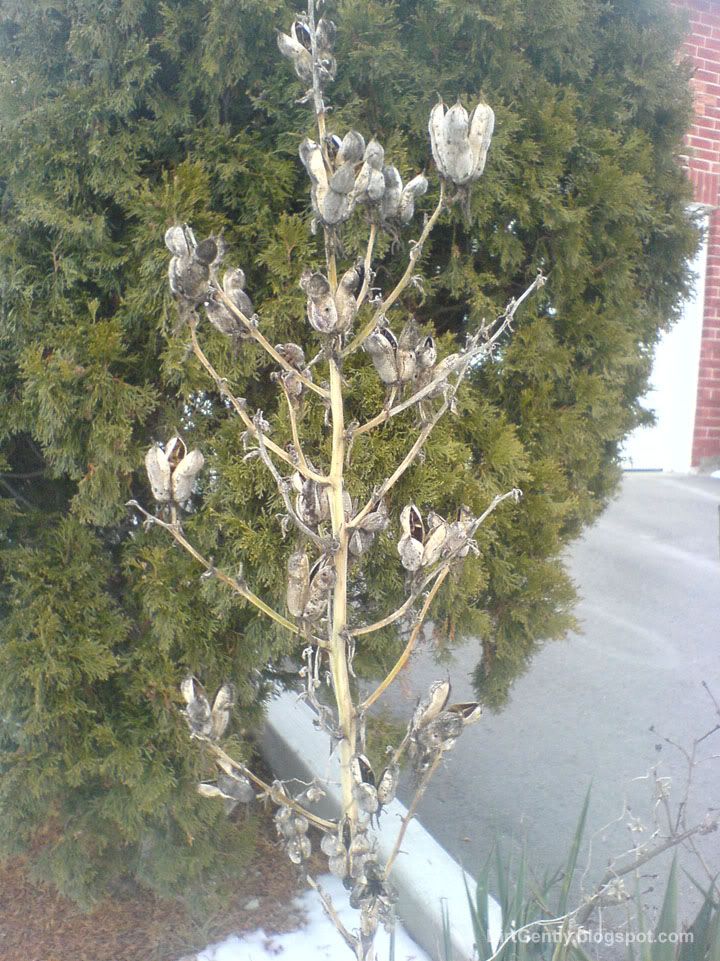
Seed snatcher!
A belated Happy New Year everyone! I'm back home after a much-needed vacation, and happily, despite my initial fears, my junk remains free of TSA molestation!
While away, I came across this plant with intriguing seed pods.

Even though I had no idea what plant it was, I knew I had to liberate some of the pods for my own nefarious ends. But as usual, I have no idea what the plant could be. They look remarkably similar to the iris seed pods that I snatched earlier this year, except these pods come in clusters of three, and instead of being elongated footballs, they're more peanut-shaped. Off to the Seed Site I go for a whack at a plant ID!
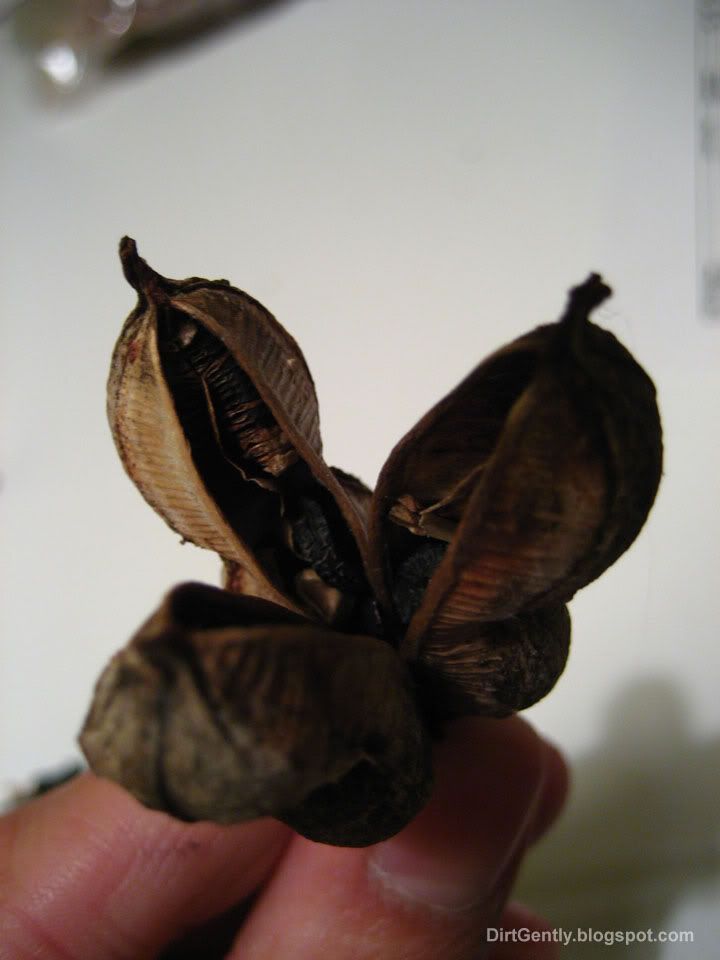
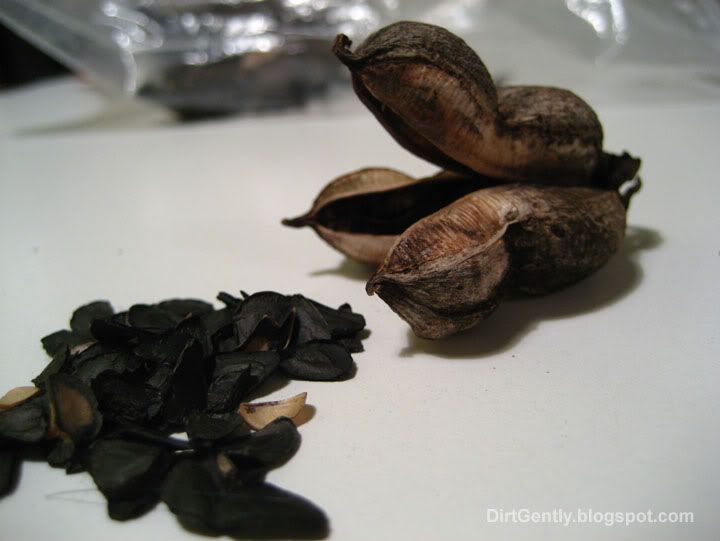
Here's some close-up pictures of the pods in case you'd like to play along:


While away, I came across this plant with intriguing seed pods.
Even though I had no idea what plant it was, I knew I had to liberate some of the pods for my own nefarious ends. But as usual, I have no idea what the plant could be. They look remarkably similar to the iris seed pods that I snatched earlier this year, except these pods come in clusters of three, and instead of being elongated footballs, they're more peanut-shaped. Off to the Seed Site I go for a whack at a plant ID!
Here's some close-up pictures of the pods in case you'd like to play along:
Subscribe to:
Posts (Atom)